Last time we looked at how to make a basic rhythm, and in this tutorial we’re going to take that rhythm and play around with it, dub style. We’ll look at some basic techniques to get that dub sound. Again we’ll be using FLstudio, but equivalents should be found on whatever platform you’re working with. If you’re already au fait with automation techniques you should find this tutorial a doddle.
1) Delay
Delay is the first tool that we think of when it comes to making dub. It’s a staple of dubbers everywhere, from the genre’s humble beginnings to modern branches. Delay is what creates echoes of the instruments, it lets us play with a track that’s already been laid down to create new rhythms and soundscapes. There are lots of delay vsts out there, but we’re going to stick with an FL delay – this time Fruity Delay 2. It’s not my favourite sounding delay vst, but we can create some nice sounds if we know what we’re doing, and it carries the added bonus of being linkable to a midi controller, which is what we want. If you don’t have a midi controller, don’t worry, you can achieve similar effects tweaking the knobs with your mouse. As mouse control is not so easy, you may want to do more editing in the automation envelope afterwards, which we’ll look at later.
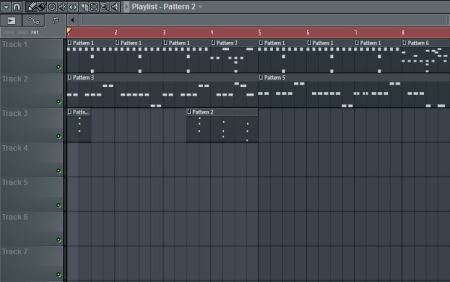
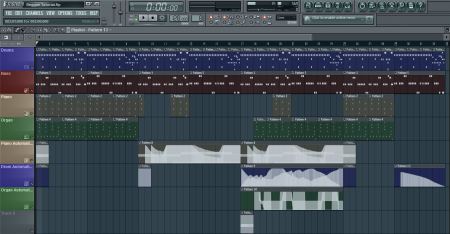
Dub is spacious, so we’re going to take our drum track and our bass track from last session and lay them out for a few bars by themselves. Then, we’re going to take our piano loop and cut out a few slices using the knife tool, setting them sparsely across the track. Think about where you want your echoing stabs to come in, and remember to leave space for the delay echo we’re going to create in a minute. Here’s my version (fig 1.1)
Now, send your piano instrument to a spare mixer track and drop the Fruity Delay 2 onto it. If, like me, you’re using a midi-controller to do some live dubbing, bring the delay vst up, right click on the knobs mentioned below and select ‘link to controller’. Twiddle the corresponding knob on your midi device and it should automatically link. If you’re not using midi, you’ll just have to record one knob at a time, using your mouse. Remember, for non-Fl vsts we have to do this anyway.
The parameters we’re interested in for this tutorial are the feedback volume, the feedback cut off and the time.
Feedback volume – determines how loud the feedback will be (therefore potentially making more feedback or petering out).
Feedback cut off – determines what frequencies are in the feedback (from treble to bass)
Time – how quickly the echoes repeat themselves.
Unfortunately with this vst if you touch the time dial while you can still hear feedback, it cuts the process dead, so only use this one where there’s a gap of piano silence and you want to change how quickly the next echoes will repeat.
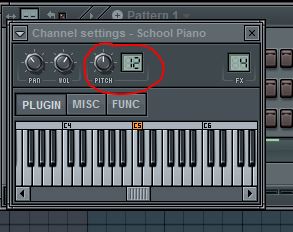
Before we start we’re going to link one more parameter to our controller – that’s the pitch of the piano. Bring up the channel settings, right click on the pitch knob and ‘link to controller’, then change the semitone value to 12 (fig 1.2). This means the knob has a range of 12 semitones – meaning that we can crank the pitch up or down an entire octave.
Play your loop and tweak the knobs, get a feel for what they do and how you can use them. When you find something you like, you’re almost ready to record it!
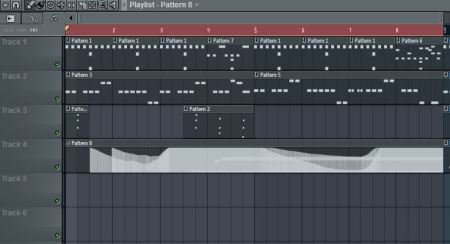
We’re going to record in an empty pattern. Bring a new one up and place it underneath where you’re going to record. Everything you record will appear there in the form of an editable wave.
To record, right click on the record button underneath the time and ensure ‘automation’ is ticked. Then press the record button. When you’re ready press play and tweak your knobs!
When you’re finished you should have something that looks like this (fig 1.3).
Click Here: Figure 1.3 Audio
You can ‘undo recorded stuff’ in ‘edit’ if you’re not happy with your take, and have another go.
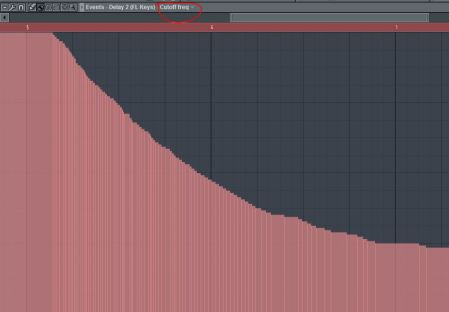
Have a listen to my crazy version. I like it, but I think that the end fades out too quickly. Instead of trying to get everything right again, we can go to the pattern, and manually edit things there. Double click your pattern and an editor will open up. At the top you will see a drop down bar of parameters. Here I need to either change the cut off frequency or the feedback volume, so I’m going to select one of those and edit it with the paint brush (fig 1.4). This editing process is fiddly so it may take some getting used to! Remember there’s always the undo option if you don’t like something.
Remember, delay isn’t just for your cut up skank. Try it with melody, vocals and drums. You may want to add a track that solely cuts in a snappy snare with reverb, and then automate the delay over that.
2) LP filter
Adding a low pass filter to the drums can create an nice dubby range of background noises. Add Fruity Fast LP to your drum’s effect chain, link the two available knobs to your controller like we did with the delay, and you’re ready to party!
Remember the knobs work in opposite ways – the cut off fully up and the resonance fully down will give you your normal, dry drums (fig 2.1). Tip: the lower the cut off frequency, the more you will rely on the resonance to hear the drums ring out in the mix.
Simply repeat the process involved with the delay to record your low pass drums. If you’re not intending to repeat your piano delay you can even record into the same pattern, although I recommend a new pattern in case later you want to repeat one effect and not the other.
Click here: LP Drums Audio
3) Other effects
In place of an LP filter, an often used effect is the phaser, of which Fl again has a couple. Similarly a flanger can be used. For less conventional offshoots of dub you can use a bitcrusher or distortion vst. I won’t go into every one, the process would be repetitive. We have already looked at how to dub it, now it is for you to pick different filters and effects, and experiment with the sounds you can make. There is, however, one technique still left to be looked at.
4) The good ol’ off and pan
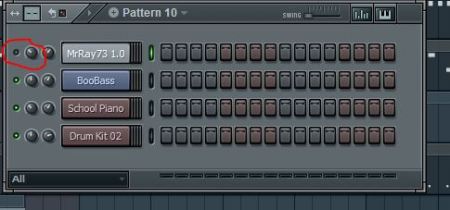
One way to create a dubby feel is to cut your loops up and spread them out, like we did a bit in the first section with our piano. There is a way we can do that live, though, and it will create a different feel to clinically cutting and pasting. Go to the step sequencer and select the organ, now link your controller to the mute/solo button and the pan dial (fig 4.1). Play with cutting the organ in, in different places over your track. You’re now ready to dub it live!
Click here: 4.1 Audio
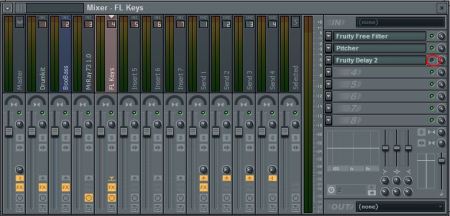
A couple of parting tips – when you no longer want your effects on you need to automate the effect mute button, locatable in the mixer, next to the desired effect (fig 4.2). Remember to record an envelope to reset every effect that you don’t want to run throughout your track. I usually have an ‘off’ envelope and and ‘on’ envelope for each effect, which I can then paste where I want in the track. Try to make your dubs nice and spacey, don’t try to put in too much at once. Most importantly, cut things up, muck about, experiment and have fun – dub should always be a laugh for the creator!
I’ll leave you with a mix. As we were working at 128bpm, let’s make 32 bars of dub, or one minute exactly. Here’s my finished version:
Click here: A Minute of Dub Audio
Until next time, keep on dubbing!



thank you, im making some 128 bpm dubby stuff, my style lol found this helpful 😀
Glad to be able to spread the love David! Post us a link below when you’re done.
Awesome! Just happened to stumble upon this from google and I’m really impressed. Really got to know much from this.
Thanks.
Would like to know if you have more tutorials and if you’re also on youtube.
Thanks Danny.
As yet there are no more tutorials, although I may get around to making a new one. What I wanted was to coax some other dubbers I know into making tutorials, but I haven’t cornered anyone yet!
Also, no youtube of these tutorials I’m afraid, solely the text-and-audio versions. I’m sure there are plenty of youtube tutorials specific to the DAW you’re using though! Have a search and see. Also, feel free to post a link to any music you make as a result of this tutorial. I’d like to hear what it inspires!
Pingback: Making Reggae Tutorial 1: “The Basics” | Wah Wah Zine
i really appreciate this
Thank you Calvin, glad it was of use to you.
Good one men love it,.now am doin greate with ma fli studio..,
WAH WAH, yah a blessing come my way.
this tututs have made me make reggae of my own style.
jaah bless yah.
This tutorial really helped me, I finally made some reggae.
Used daw is LMMS
If you’re interested, and or are willing to give some feedback:
That’s pretty good Guus. You’ve got an ear for digi-reggae! Particularly like the echoey rim-shots. The next thing I would look into is making some drum rolls and variations. In fact, I might do a mini-tutorial on it… one day…
Thank you very much, you saying this is special to me.
I will be looking forward to you’re mini tutorial on drum rolls and rim shots. one day 😉
I wish we could do updates on already uploaded tracks on streamcloud, but since we can’t. I have to put up a new link:
Its not really changed. I like to think of it as some fine tuning.
Sigh, something went wrong:
This is awesome 🙆. Looking forward to another tutorial
very very helpful.I’m glad to be here.thank’u.ps:i’m not english so sorry for my bad english.
Your English is fine 😉 thanks for taking the time to comment.