UPDATE: since I wrote this tutorial people have been asking me for a video version. I finally got around to it. Beneath is the classic text & audio version–which you can still use–but if you prefer video, here we are!
So, we love that reggae groove but we don’t know just how to lay it out and get it authentic. Let’s start with the very basics and work our way up to a full blown reggae tune. For this tutorial I’m going to be working in the FLstudio piano roll, but if you’re working in any DAW (Digital Audio Workstation, e.g. Reason, Acid Pro etc) the piano roll should work similarly, and you can even follow this if you’re recording instruments by listening and playing along.
The Drum Beat
I often start with the bassline for a reggae tune, but it’s important to know the basics of the beat before we map out the bass, so let’s start with the drums.
1) The hi-hats
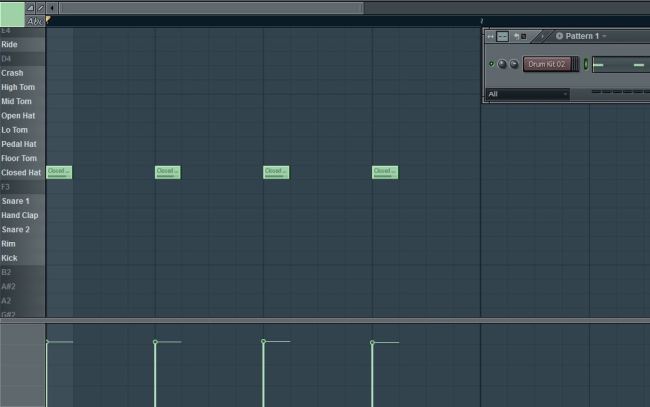
I’ve opened up drumkit 2 in FLstudio, mainly because it gives you the names of the items of drum kit that we’ll be working with, but also it’s a quite organic ‘reggae-ish’ sounding kit. You can use any sound set you like though, depending on the vibe you want – electronic kits, 8 bit kits or even noise samples if you want to get experimental. First of all, set your bpm to what you want. Here I’ve gone with 128, but the speed is entirely up to you. The first thing to do with the hi-hat is to mark the beat ‘1, 2, 3, 4’ (fig 1.1). quite easy, huh?
Click here: Fig 1.1 Audio
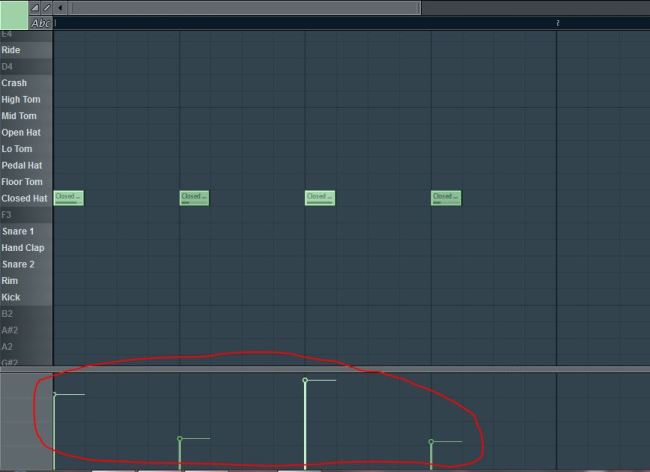
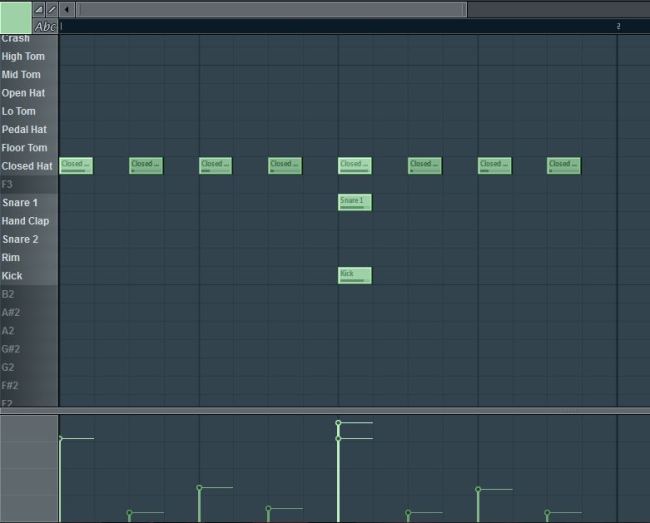
Now you can hear that the sound quickly becomes annoying and monotonous on the ears. That’s because, unlike in real life, there is no variation in electronic sounds. So, let’s vary things a bit. Now, in reggae it’s important to know that the rhythm revolves around the third beat – the third will be the most emphasised. To change emphasis and get a groove going, we’re going to play with the velocity of the notes, the envelope you can see below the notes themselves. I’m going to turn the third up slightly, and the second and fourth down (fig 1.2). Now it doesn’t sound so annoying and has a groove to it.
Click here: Fig 1.2 Audio
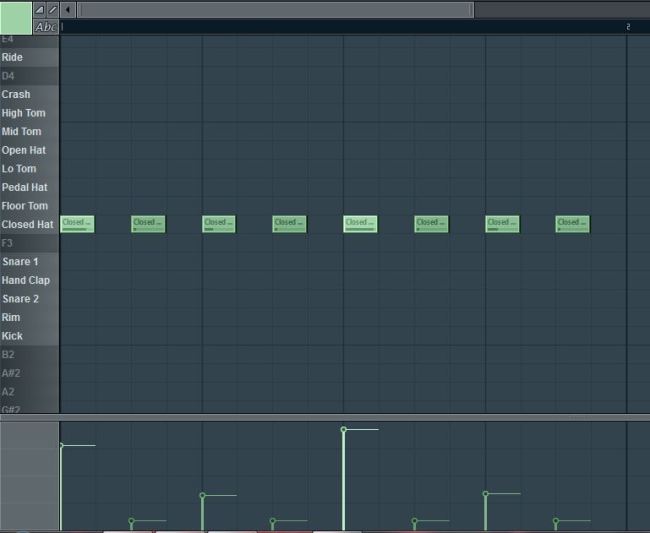
Finally, to fill it out, we’re going to put some ghost notes in. I’m just going to fill in those gaps between each beat with extra notes, turned down quite low (fig 1.3). When you have all of your instruments playing, you should hardly be able to hear these notes, but they add a crispness and life that you would otherwise be missing.
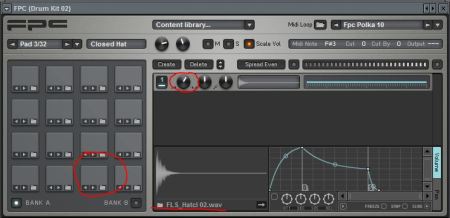
Now that we have our hi-hat rhythm we need to think about the mix. Hi-hats are in the treble range, which tends to come to the front of the mix and sound overbearing. We don’t want this. In reggae the hi-hats are very subtle, at times almost not there. So we’re going to locate our hi-hats in our instrument and turn them down. You may want to return to this to get it right when you have your full mix. On the FPC vst that opens up drumkit 2 in Flstudio, that’s here (fig 1.4):
2) Bass drum/snare
The most simple and effective beat in reggae is the one-drop. This means that the bass drum drops only once, on our pivotal third beat (fig 2.1) (I’m going to add the snare in with this for the sake of this tutorial, but there are many plays we can make with the snare). Do not be fooled by the simplicity of the one-drop: Bob Marley’s drummer was famous for his one-drops – it’s a good way to go for old-school reggae.
Click here: Fig 2.1 Audio
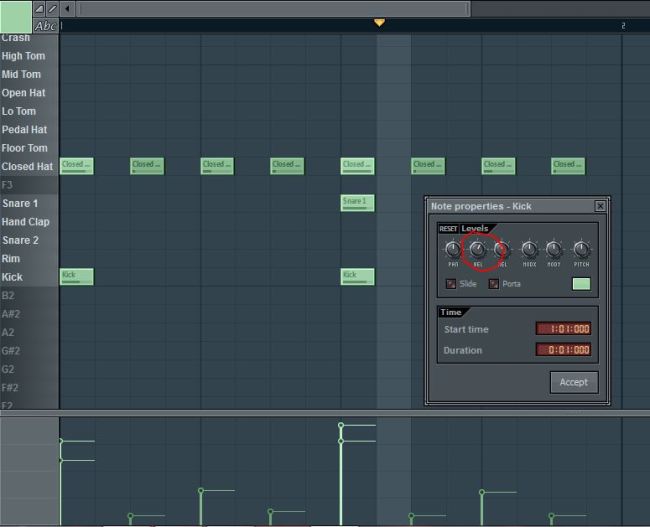
If you want a more solid and conventional beat you can go for the two-drop. It’s as simple as it sounds, you add in a bass drum on the first beat as well (fig 2.2). You can see here that I’ve lowered the velocity of the first bass drum slightly to keep that groove.
Click here: Fig 2.2 Audio
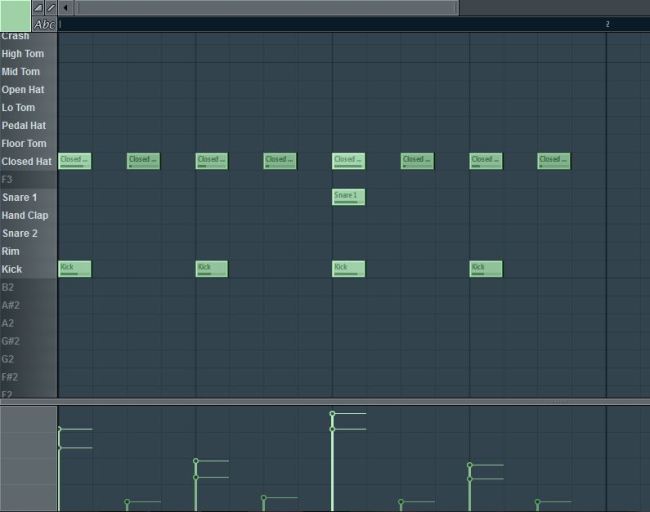
The third main style of beat is called steppers. You create this by punctuating each beat with a bass drum hit, creating a stepping sound. Again, I’m going to make the intermediate bass hits lower velocity (fig 2.3). This beat is good for more modern and heavy sounding reggae styles.
Click here: Fig 2.3 Audio
Of course, this is the most simple form of reggae rhythm that we’ve created today. You can try adding swing, using the open hi hat in places, moving some of the beats around, adding more percussion etc. Play with it until it sounds how YOU want!
The Skank
3) The upbeat
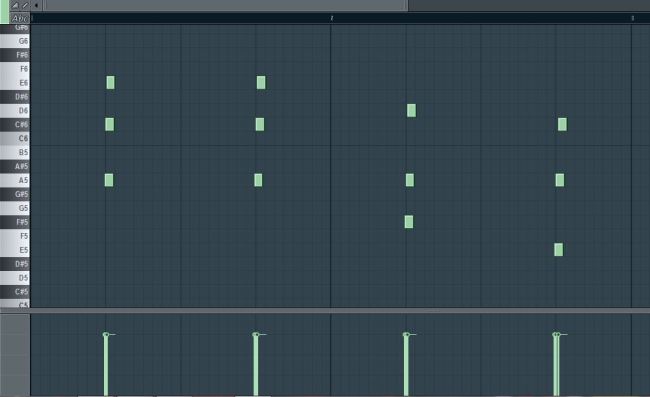
In a bar of four beats we have two types of beat, the downbeat (beats 1 and 3), and the upbeat (beats 2 and 4). Most conventional music revolves around the downbeat, or all beats equally. In reggae the upbeat is quintessential. For this tutorial I’m going to use readily available vsts, so I’m picking FLkeys – an average sounding piano vst. Here you can see I’ve put a piano strike at the second and fourth beat (the upbeat) over TWO bars (fig 3.1). Listen to how the piano plays with our one-drop. The upbeat is better snappy and shocking, so I’ve reduced the notes to half a measure, to be fair we could shorten them more. Also I’ve taken off the ‘snap to grid’ feature and splayed the notes slightly so that they sound more realistic. Our pianist comes in slightly early on the bass side and leaves slightly late on the treble. We’re playing here in the fifth to sixth octaves, meaning our piano should ring out nicely in low-mid to mid frequencies.
Click here: Fig 3.1 Audio
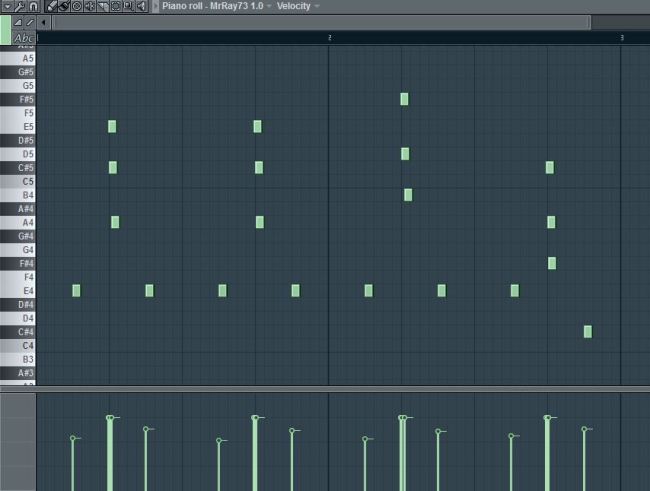
The bubble plays with the upbeat to create a more layered and textured reggae sound. In addition to playing the upbeat we’re going to pick out some of those in-between notes to create a jumpier, jivier groove. The most simple and common form of the bubble is what I call the down-up-down bubble (fig 3.2). I was loathe to find a decent organ vst on FL so I’m using the freeware Mr Ray 73 – available here: http://www.vst4free.com/free_vst.php?id=274. We’ve added in the offbeat notes before and after the upbeat, again playing with velocity and timing of notes (this time our organist is early on the upper range to late on lower). I find playing the bubble a little lower down than the skank works well, shorter, low-mid notes tend to sound less tonal and more percussive, which sound great in reggae.
Click here: Fig 3.2 Audio
The Bass
4) Basslines
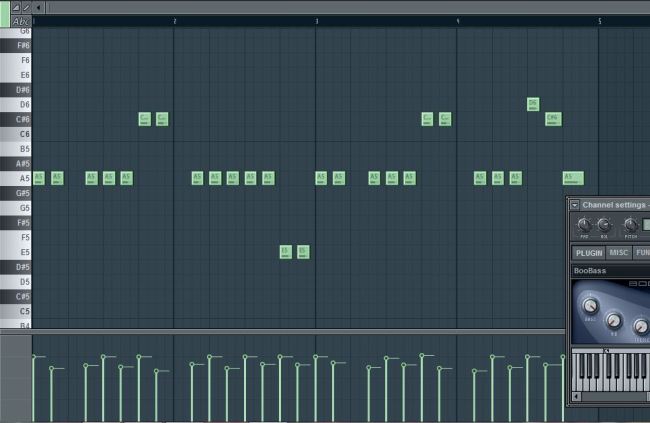
In reggae, the bass acts as something more akin to the lead or melody in a lot of genres. It drives the music, it’s the heart. I can’t tell you exactly which notes to play, just give you a feel with example. Let the bass play off both the drums and the skank. In this example listen particularly to the pauses, how they give a little free-fall jumpiness to the rhythm. Here I’ve used Fl’s BooBass, turning the mid and treble right down and the bass right up, to get as close to that old, woolly sounding bass of 70’s reggae as I can get. Notice again I’ve played with velocity to get the bass sounding organic (fig 4.1). As a general rule, the beat notes should be louder, and this is what I’ve done here, but I’ll leave it for you play with. As for the melody of the bass, you can see it is quite elemental, only using four or five notes in total. Notice that the bubble has disappeared a little into the bass. This is actually nice, because you can hear it’s now ‘bubbling’ out of the bass to join to skank, creating a unified rhythm. Reggae bass doesn’t have to be so complex in melody, because it’s all about the rhythm. More rapid plucking of the bass, coupled with more gaps and spaces will leave you with a more dubby sounding bass. Take the notes down an octave and it’s even dubbier. A more simplistic ‘walking’ bass will give you a more rocksteady/bluebeat feel. I’ll leave those choices to you!
Click here: Fig 4.1 Audio
So hopefully you can hear we’re well on our way to a lovely reggae reggae tune, and that’s even before we’ve thought about mixing, stereo, arrangements and effects. I hope you enjoyed this little tutorial and until the next time, keep on skanking!


Pingback: Some questions about Reason. - Future Producers forums
Very simple and interesting and educative.
Pingback: Reggae Tutorial 3: Alternate Beats | Wah Wah Zine
Thank you, I have been searching for a good tutorial for while, and now I found it.
THANKS Bru!!! Cool.
Pingback: RESEARCH LEARNING/ZONE | GOSPEL MIXTAPE
Super tuto. Avez vous un lien pour un tuto DUB également?
Wow! It’s amazing.
good fl
What tempo should i use?
Whatever tempo sounds right to you, Onap. Could be anything between about 80 and 180bpm. Depends on the feel of your track. If you’re not sure, my advice is write a bar or two and then slide the tempo up and down until the groove sounds right to you. Hope that helps.
BTW, I thought I’d mentioned the tempo in this tutorial – but now I think I only mention it in the second part. This is 128bpm, if you want to reproduce it exactly.
Thank God,I came across this……so helpful